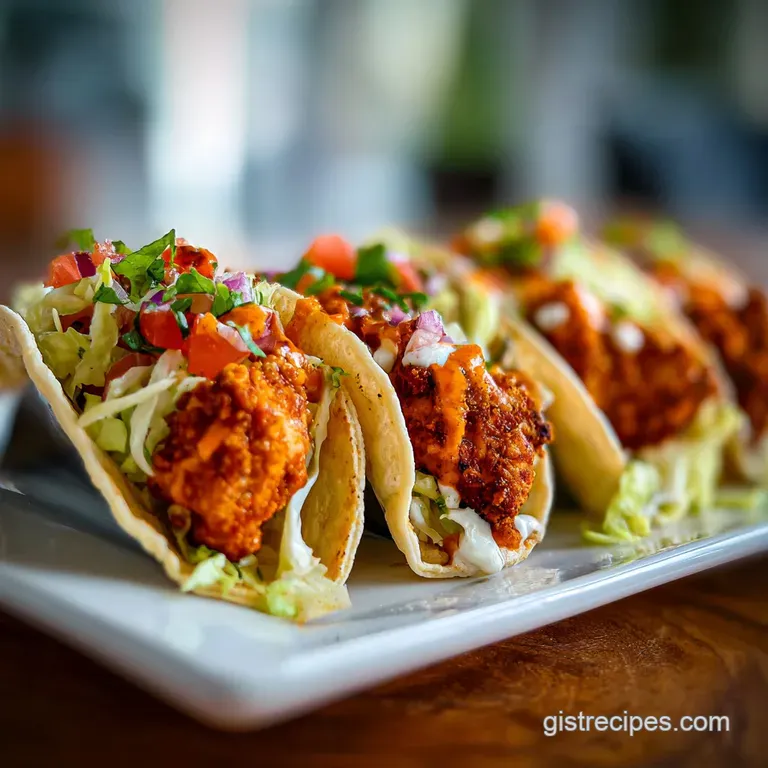
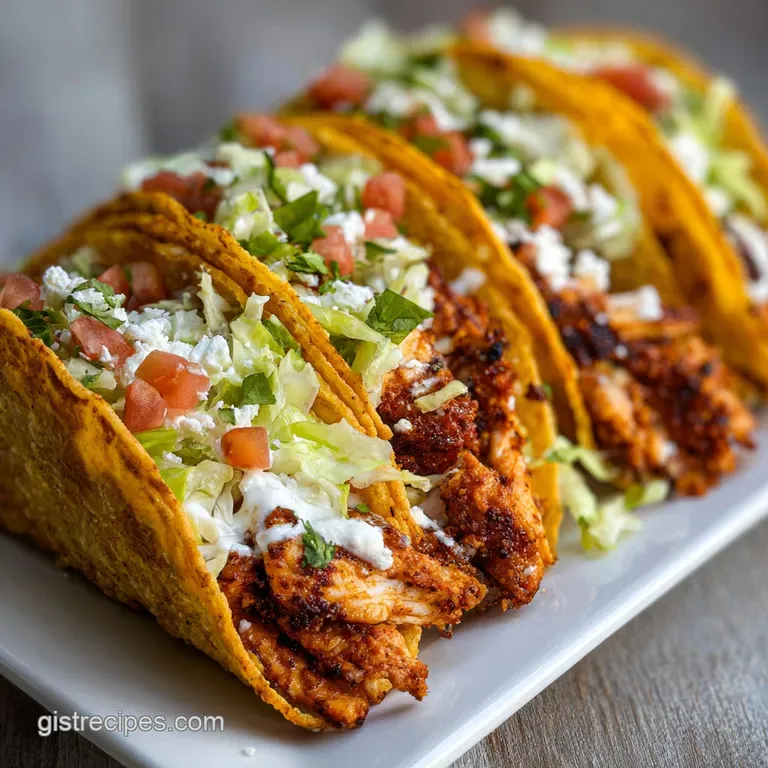
Baked Chicken Tacos Recipe
- Time: Active 15 minutes, Passive 15 minutes, Total 30 minutes
- Flavor/Texture Hook: A shatter crisp corn shell giving way to a velvety, spiced chicken center.
- Perfect for: Busy weeknights, family gatherings, or anyone who hates the "falling apart taco" struggle.
- The Secret Behind These Baked Chicken Tacos
- Why This Recipe Works
- Component Analysis of Essential Taco Ingredients
- Everything You Need for Your Taco Night
- Essential Tools for a Seamless Kitchen Experience
- Mastering the Art of the Baked Taco
- Common Mistakes and Practical Troubleshooting Tips
- Adjusting Portions for Family Gatherings and Events
- Flavor Variations and Creative Ingredient Substitutions
- Preservation Secrets for Leftovers and Zero Waste
- Perfect Complements to Complete Your Family Meal
- Recipe FAQs
- 📝 Recipe Card
The Secret Behind These Baked Chicken Tacos
Imagine the kitchen filling with the toasted, nutty aroma of corn shells warming in the oven while a hint of zesty lime and spiced chicken wafts through the air. There is something deeply comforting about a row of tacos lined up in a baking dish, their tops bubbling with golden Monterey Jack cheese that has just begun to lace over the edges.
It is a far cry from the usual chaos of assembly line taco nights where the first taco is stone cold by the time the last one is built.
I remember my first attempt at this dish years ago. I was trying to feed a house full of cousins, and I was tired of standing over the stove while everyone else laughed in the living room. I decided to pack the shells into a 9x13 dish, cramming them in like little soldiers so they wouldn't tip over.
When I pulled that pan out of the oven, the shells were warm and toasted, the cheese had created a molten seal over the meat, and for once, I got to sit down and eat with everyone else. It changed our family Sunday's forever.
This approach solves the three biggest taco tragedies: cold fillings, soggy bottoms, and the inevitable structural failure of the shell after the first bite. By using "stand and stuff" style shells and a quick stint in a hot oven, we create a structural masterpiece.
The heat doesn't just melt the cheese, it actually fuses the ingredients together, making each taco a self contained, handheld delight that holds up against even the heartiest dollop of sour cream or extra salsa.
Why This Recipe Works
- Capillary Action Control: The cheese acts as a hydrophobic barrier between the moist chicken and the porous corn shell, preventing the dreaded "soggy bottom" syndrome.
- Thermal Equilibrium: Baking the tacos en masse ensures the filling reaches an internal temperature that mirrors the exterior crunch, avoiding the "hot shell, cold meat" disappointment.
- Starch Retrogradation: Briefly reheating the pre baked corn shells in the oven realigns the starch molecules, restoring the "shatter" factor that disappears in humid pantry storage.
- Fat Soluble Spice Activation: The 1.5 tbsp taco seasoning contains spices like cumin and chili powder that release their full aromatic potential only when heated in the presence of the chicken's natural fats.
| Thickness | Internal Temp | Rest Time | Visual Cue |
|---|---|---|---|
| Standard Shell | 165°F (filling) | 3 minutes | Cheese is bubbly and edges are lightly browned |
| Extra Thick Shell | 165°F (filling) | 5 minutes | Shell looks matte and smells deeply toasted |
| Mini/Street Size | 160°F (filling) | 2 minutes | Cheese laces over the sides and turns golden |
When you are deciding between different methods for your family dinner, think about the final texture you want to achieve. If you are looking for that classic, hearty crunch that reminds you of Grandma's kitchen but with a modern twist of convenience, the oven method is your best friend.
It provides a consistent heat that a microwave or a simple assembly line just cannot match, ensuring the 3 cups of shredded rotisserie chicken are perfectly integrated with the 0.5 cup of salsa.
Component Analysis of Essential Taco Ingredients
| Ingredient | Science Role | Pro Secret |
|---|---|---|
| Monterey Jack Cheese | Low melting point emulsifier | Grate it fresh from the block for a much smoother melt without the grainy starch coating. |
| Fresh Lime Juice | Acidic structural brightener | The 2 tbsp of juice breaks down the heavy fats in the chicken, making the flavor profile feel lighter. |
| Canned Green Chiles | Humidity regulator | Draining the 4 oz of chiles thoroughly prevents excess steam from softening the shell during the bake. |
The interaction between the acid in the lime and the protein in the rotisserie chicken is what gives this dish its "bright" flavor profile. Without that hit of citrus, the tacos can feel a bit heavy or one note. Similarly, choosing the right cheese is about more than just flavor; it is about the physics of the melt.
Monterey Jack is the gold standard here because it flows into the crevices of the shredded meat, creating a cohesive filling that does not tumble out of the shell.
Everything You Need for Your Taco Night
- 3 cups (450g) shredded rotisserie chicken: Provides the hearty base. Why this? It's pre seasoned and tender, saving hours of slow cooking.
- 4 oz (113g) canned diced green chiles, drained: Adds mild heat. Why this? Provides moisture and a subtle earthy tang without being overwhelming.
- 0.5 cup (120ml) chunky salsa: The primary flavoring agent. Why this? The vegetable chunks add texture to the shredded chicken.
- 1.5 tbsp (15g) taco seasoning: The classic spice blend. Why this? Concentrated flavor that permeates the chicken during the bake.
- 2 tbsp (30ml) fresh lime juice: Essential acidity. Why this? Cuts through the richness of the cheese and chicken fats.
- 12 stand and stuff style hard corn taco shells: The vessel. Why this? Their flat bottoms make them perfect for high volume oven baking.
- 2.5 cups (280g) shredded Monterey Jack cheese: The glue. Why this? High fat content leads to a velvety melt and beautiful browning.
- 0.5 cup fresh cilantro, finely chopped: The fresh finish. Why this? Adds a burst of color and a herbal top note after baking.
If you find yourself missing an ingredient, don't panic. This recipe is incredibly forgiving, and your family classics are often born from a little bit of kitchen improvisation. The beauty of the baked taco is its adaptability to whatever you have in the pantry, as long as you keep the moisture to crunch ratio in balance.
| Original Ingredient | Substitute | Why It Works |
|---|---|---|
| Monterey Jack | Sharp Cheddar | Adds a more aggressive, salty punch. Note: It's oilier, so expect more "sizzle" on the shells. |
| Rotisserie Chicken | Cooked Ground Beef | Classic taco flavor. Note: Ensure it's drained well to avoid a greasy base. |
| Chunky Salsa | Enchilada Sauce | Creates a "wet" taco experience. Note: Use half the amount to keep shells crispy. |
Sometimes you want a slightly different flavor profile or perhaps you're looking for a bit more heat. If you're feeling adventurous, you might consider swapping the standard salsa for my Crockpot Salsa Verde recipe to give the filling a tangy, roasted tomatillo kick that pairs beautifully with the Monterey Jack.
Essential Tools for a Seamless Kitchen Experience
You don't need a professional kitchen to pull off the perfect taco night, but a few specific items make the process much smoother. First and foremost, a high-quality 9x13 inch baking dish is your best friend here.
Glass or ceramic both work well, but ceramic often provides a more even heat distribution which helps the shells toast without burning the bottoms. You want something with high sides that can support the shells so they don't tip over and spill their precious cargo.
A sturdy mixing bowl is essential for combining your 3 cups of shredded chicken with the seasonings and lime juice. I also highly recommend using a hand held cheese grater. While it is tempting to buy the pre shredded bags, the cellulose powder they add to keep the cheese from clumping actually prevents it from melting into that velvety blanket we are looking for.
Grating your own 2.5 cups of Monterey Jack takes about three minutes and makes a world of difference in the final texture.
Finally, have a pair of small tongs or a narrow offset spatula ready for serving. Once these tacos are baked, they are hot and the cheese is molten. Using the right tool to lift them out of the dish ensures you don't crack the shells that you've worked so hard to keep perfectly crisp.
It’s the little details like this that turn a regular meal into a family favorite.
Mastering the Art of the Baked Taco
- Preheat your oven to 400°F (200°C) and lightly grease your 9x13 baking dish. Note: This prevents any cheese that bubbles over from sticking to the pan.
- In a large bowl, combine the 3 cups of shredded rotisserie chicken, 4 oz of drained green chiles, and 0.5 cup of chunky salsa. [Mix thoroughly] until the chicken is evenly coated and glossy.
- Sprinkle the 1.5 tbsp of taco seasoning and 2 tbsp of fresh lime juice over the chicken mixture. [Toss] until the aroma of the spices becomes fragrant.
- Arrange the 12 stand and stuff taco shells in the baking dish. [Place them snugly] until they support each other in an upright position.
- Spoon about 1-2 tablespoons of the 2.5 cups of shredded Monterey Jack cheese into the bottom of each shell. Note: This creates a "cheese floor" that protects the shell from the moist chicken.
- Distribute the chicken filling evenly among the 12 shells, pressing down slightly. [Fill each shell] until the chicken reaches just below the rim.
- Top each taco generously with the remaining shredded cheese. [Layer the cheese] until the chicken is completely covered by a white blanket.
- Bake for 15 minutes until the cheese is melted and bubbling and the shell edges are golden.
- Remove from the oven and let the tacos rest for 3 minutes. Note: This allows the structural integrity of the cheese to set slightly.
- Garnish with the 0.5 cup of finely chopped cilantro. [Scatter the herbs] until the green pops against the golden cheese.
Chef's Tip: Freeze your block of Monterey Jack for 10 minutes before grating. This firms up the fats and prevents the cheese from "smushing" against the grater, giving you long, beautiful shreds that melt more evenly.
While the tacos are in the oven, you'll hear a gentle sizzle as the fats from the chicken and cheese interact with the corn shells. This is the sound of flavor being built. If you prefer a bit more char, you can pop the broiler on for the last 60 seconds, but watch them like a hawk!
Corn shells go from toasted to scorched in the blink of an eye, and we want that perfect golden brown finish that shatters when you bite into it.
Common Mistakes and Practical Troubleshooting Tips
Preventing Soggy Bottoms
The most common complaint with any baked taco is that the moisture from the meat seeps into the corn shell, making it soft and chewy instead of crisp. This usually happens if the salsa is too watery or if the green chiles weren't drained well.
The "cheese floor" trick mentioned in the steps is your primary defense, but ensuring your chicken mixture isn't swimming in liquid is also vital.
Managing Shell Breakage
Sometimes, despite our best efforts, a shell will crack down the side as we fill it. This often happens if the shells are stale or if we are too aggressive with the spoon. If a shell cracks, don't throw it out! Just lean it against its neighbor in the pan.
The melting cheese will act as a culinary "glue," sealing the crack as it bakes and keeping the filling inside where it belongs.
Avoiding Burned Cheese
Monterey Jack has a high fat content, which makes it melt beautifully, but the proteins can burn if exposed to high heat for too long. If your oven runs hot, you might find the cheese browning before the chicken is heated through.
If you see the cheese turning a dark brown too quickly, tent the dish with a piece of aluminum foil for the last 5 minutes of baking.
| Problem | Root Cause | Solution |
|---|---|---|
| Soft Shells | Excess liquid in filling | Drain chiles and salsa thoroughly before mixing. |
| Dry Chicken | Overbaking | Reduce bake time by 3 minutes and ensure filling is covered with cheese. |
| Uneven Heat | Crowded oven | Place the baking dish on the center rack for better airflow. |
Common Mistakes Checklist:
- ✓ Pat the rotisserie chicken dry if it seems overly greasy before shredding.
- ✓ Drain the canned chiles in a fine mesh strainer for at least 2 minutes.
- ✓ Ensure the oven is fully preheated to 400°F (200°C) before the tacos go in.
- ✓ Do not overfill the shells; leave a little room for the cheese to settle.
- ✓ Let the tacos rest for a few minutes before serving to avoid "molten chin" syndrome.
Adjusting Portions for Family Gatherings and Events
Scaling this recipe for a larger crowd is relatively straightforward because the cooking vessel is the limiting factor. If you need to double the recipe to 24 servings, it's best to use two separate 9x13 dishes rather than trying to cram them all into one.
When using two dishes, you might need to rotate them halfway through the 15 minutes of baking to ensure they both get equal exposure to the oven's heating elements.
When scaling down to 6 servings, you can use a smaller 8x8 inch square baking dish. The cook time will remain roughly the same, but keep an eye on the cheese around the 12 minute mark. Since there is less thermal mass in the oven, the smaller batch might heat up slightly faster.
If you find yourself with half an egg from another recipe, you can actually brush the outside of the shells with it before baking for an extra glossy, deep gold finish, though it's certainly not required for a comforting weeknight meal.
For very large gatherings, you can prep the chicken mixture hours in advance. However, do not fill the shells until you are ready to put them in the oven. Even with the cheese barrier, a shell sitting with moist filling for two hours will inevitably lose its crunch. If you're looking for other easy to scale meals for a crowd, you might find that my Baked Chicken Kabobs recipe offers a similar level of convenience and "wow" factor for a large group.
Flavor Variations and Creative Ingredient Substitutions
Creating Low Calorie Baked Chicken Tacos
For a lighter version of this family classic, you can make a few simple swaps that don't sacrifice that hearty feeling. Use a reduced fat Monterey Jack or even a part skim Mozzarella for the topping. While the melt won't be quite as luxurious, it still provides that essential savory topping.
You can also increase the ratio of green chiles and salsa to chicken, adding more bulk and flavor with fewer calories than the meat alone.
For a Spicy Kick
If your family likes to live on the edge, you can easily turn up the heat. Swap the mild green chiles for canned jalapeños or add a teaspoon of chipotle powder to the taco seasoning. Using a "Pepper Jack" cheese instead of plain Monterey Jack adds built in spice throughout the melt.
Just be sure to warn your guests before they take that first big, crunchy bite!
Plant Based Swap
While this recipe centers on chicken, you can achieve a similar comforting result using a mixture of black beans and roasted sweet potatoes. The key is to mash about a third of the beans to act as a binder, ensuring the filling stays inside the shell just like the shredded chicken would.
The bake time remains the same, as you're primarily looking to toast the shell and melt the cheese.
If you want a specific outcome, try these tweaks: If you want a smoky depth, add 1/2 tsp of smoked paprika to the seasoning mix. If you want extra crunch, spray the outside of the shells with a light coating of avocado oil before baking.
If you want a creamy finish, dollop a small teaspoon of cream cheese into the bottom of the shell before the chicken.
Preservation Secrets for Leftovers and Zero Waste
Storage Guidelines: You can store any leftover tacos in the refrigerator for up to 3 days. It is best to place them in an airtight container lined with a paper towel, which helps absorb any residual moisture and keeps the shells from becoming completely mushy.
For freezing, I recommend freezing the chicken filling separately in a freezer safe bag for up to 2 months. Freezing the fully assembled tacos is not recommended, as the corn shells will lose their structural integrity upon thawing.
Reheating Tips: To bring that "shatter" back to the shell, avoid the microwave at all costs! Instead, place the leftovers on a baking sheet and heat them in a 350°F (180°C) oven for about 8 to 10 minutes.
This will recrisp the corn and remelt the cheese without making the whole thing chewy. If you're in a hurry, an air fryer at 325°F for 4 minutes works wonders as well.
Zero Waste Ideas: If you have leftover chicken filling but ran out of shells, don't let it go to waste. This mixture is incredible when stirred into a morning omelet or used as a topping for a quick taco salad. You can even use the leftover 0.5 cup of cilantro stems! Finely mince the stems and add them to your next pot of rice; they hold a ton of flavor that most people mistakenly throw away. If you find yourself with extra rotisserie chicken that didn't make it into the tacos, it’s the perfect head start for a 30 minute Chicken Fried Rice recipe.
Perfect Complements to Complete Your Family Meal
To round out this meal, I love serving these tacos with a side of cool, lime infused sour cream and a big bowl of guacamole. The richness of the avocado provides a beautiful contrast to the crispy corn shell.
A simple side of black beans seasoned with a little garlic and cumin also adds a hearty element that keeps the family full and happy.
If you are looking for a fresh vegetable component, a crunchy cabbage slaw with a vinegar based dressing offers a bright "zing" that cleanses the palate between bites of cheesy taco goodness. It's all about those contrasts: the hot, melty interior of the taco versus the cold, crisp slaw. If you have leftovers and want to mix things up the next day, this chicken filling also works surprisingly well inside a Chicken Shawarma Wrap recipe if you swap out the taco spices for some cumin and coriander.
There’s a special kind of magic that happens when you bring a bubbling tray of these tacos to the center of the table. It’s more than just a meal; it’s an invitation to slow down, share stories, and enjoy the simple pleasure of a dish made with love.
Whether it’s a Tuesday night or a special birthday request, these tacos never fail to bring a smile to everyone’s face. Trust me, once you try the baked method, you'll never go back to the old way again. Let's get cooking!

Recipe FAQs
Can I use pre-shredded chicken instead of rotisserie?
Yes, but drain it thoroughly first. Pre-shredded chicken is often packed in broth or water, which increases the filling's moisture content and risks a soggy shell. Pat it dry to maintain the crispness we aim for.
Why are my taco shells getting soggy on the bottom during baking?
No, this is due to insufficient barrier protection. Placing a small layer of shredded Monterey Jack cheese at the bottom of the shell before adding the filling acts as a hydrophobic layer, sealing the corn from the chicken's moisture.
How long should the tacos bake to ensure the filling is hot and the cheese is melted?
Bake at 400°F (200°C) for exactly 15 minutes. This high heat ensures the filling reaches a safe temperature while simultaneously toasting the edges of the shell. Watch closely after 12 minutes as the cheese browns quickly.
How to make the filling ahead of time for quick assembly later?
Mix all filling ingredients except the cheese together up to 24 hours ahead. Store the mixture tightly covered in the refrigerator. Only fill and top the shells immediately before they go into the oven to maintain shell integrity.
Is it true that grating my own cheese makes a huge difference for this recipe?
Yes, grating fresh cheese yields superior melt quality. Pre-shredded cheeses contain anti caking agents like cellulose, which inhibit that velvety, cohesive melt you see when you master uniform heating techniques, similar to how we manage texture in our Alfredo Tortellini Bake recipe.
What is the best way to reheat leftovers to keep the shells crispy?
Reheat in a conventional oven, not a microwave. Place leftovers on a baking sheet and bake at 350°F (180°C) for 8 to 10 minutes. This allows the residual moisture to escape while reactivating the crispness of the corn.
How to add more citrus flavor without making the filling too runny?
Use the zest of one lime along with the 2 tablespoons of juice. The zest contains concentrated oils that add intense flavor without adding extra liquid volume, keeping your filling perfectly bound.
Baked Chicken Tacos Recipe
Ingredients:
Instructions:
Nutrition Facts:
| Calories | 220 kcal |
|---|---|
| Protein | 18.6 g |
| Fat | 11.5 g |
| Carbs | 10.5 g |
| Fiber | 1.4 g |
| Sugar | 1.1 g |
| Sodium | 375 mg |
