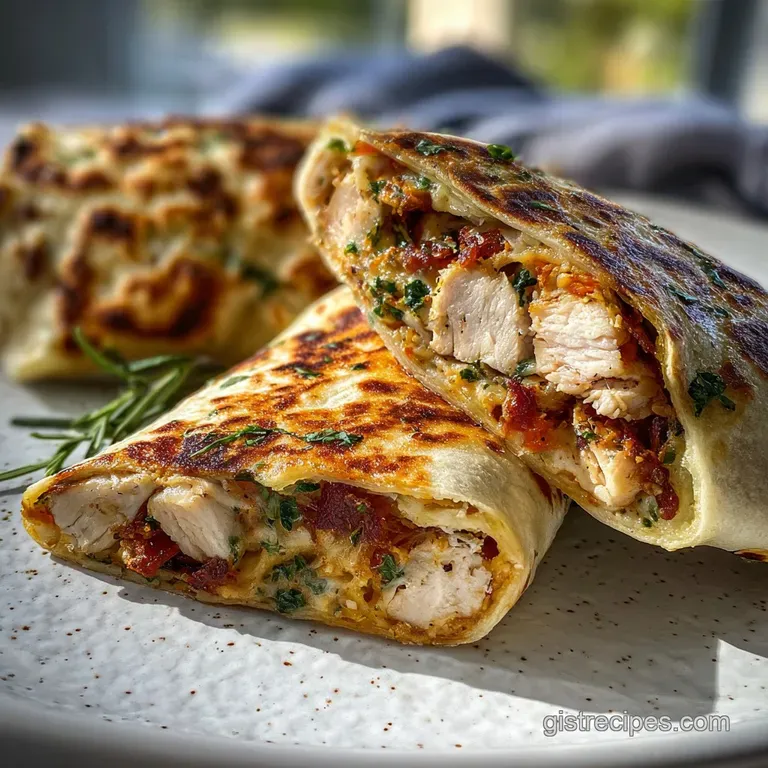
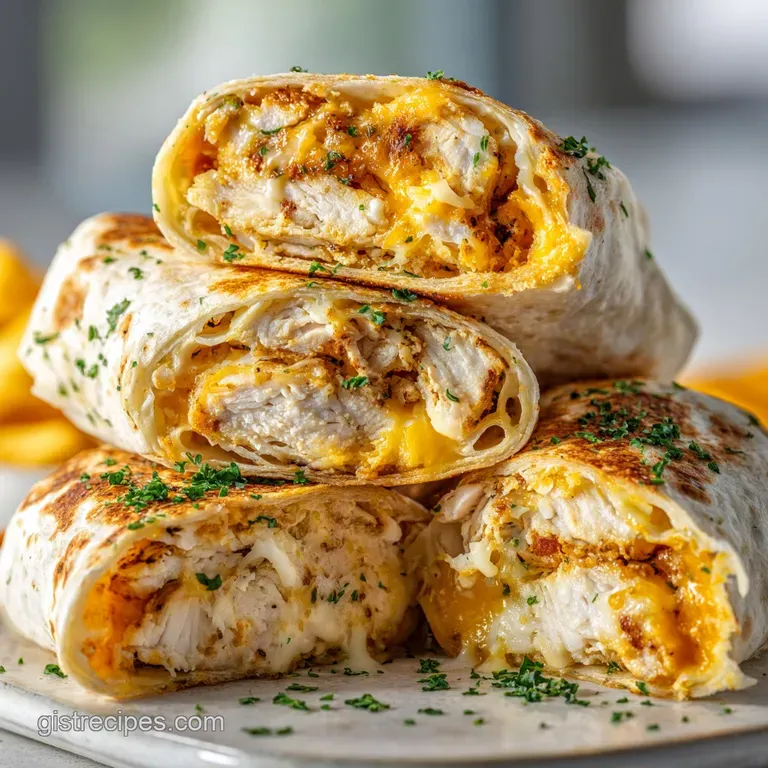
Cheesy Garlic Chicken Wraps: Shatter Crisp
- Time: Active 10 minutes, Passive 10 minutes, Total 20 minutes
- Flavor/Texture Hook: Shatter crisp exterior with a velvety, garlic infused core
- Perfect for: Cozy family weeknights or a satisfying weekend lunch
- Creating Hearty Cheesy Garlic Chicken Wraps
- The Scientific Secret to the Melt
- Component Analysis of Essential Filling Ingredients
- Selecting Every Element for Savory Success
- Standard Tools for a Professional Result
- Detailed Steps for the Golden Toasted Finish
- Addressing Kitchen Hurdles and Texture Issues
- Adjusting Flavors for Every Family Member
- Preserving Freshness for Tomorrow's Lunch
- Hearty Pairings for a Complete Family Meal
- Flour Tortilla and Garlic Myths
- Helping You Solve Common Kitchen Problems
- Commonly Asked Questions
- Troubleshooting Common Issues
- HIGH in Sodium
- Recipe FAQs
- 📝 Recipe Card
Creating Hearty Cheesy Garlic Chicken Wraps
Walking into my grandma’s kitchen on a rainy Tuesday, the first thing that hit me wasn't the sight of food, but the heavy, intoxicating scent of garlic hitting warm butter. It’s a smell that promises comfort before you even take a seat.
I remember watching her mix leftovers with a big block of cream cheese, turning yesterday's roast into something that felt entirely new and special. That’s exactly what these wraps are a way to bring that same soul warming energy to your own table without spending hours at the stove.
There’s something about the way the cheese stretches and the garlic lingers on your breath that makes a house feel like a home. I’ve made the mistake of using cold cream cheese or rushing the browning process, and trust me, the results just aren't the same.
We are looking for that specific, buttery crunch that yields to a soft, creamy interior. It is the ultimate comfort food for when life feels a bit too busy but your heart craves something homemade.
In this guide, we'll walk through how to keep that filling from leaking out and how to get that golden brown color that makes everyone reach for seconds. Whether you're feeding a group of hungry teenagers or just looking for a quiet, hearty dinner for two, this recipe delivers every single time.
It's honest, filling, and carries that unmistakable aroma of a kitchen where people are loved.
The Scientific Secret to the Melt
The Emulsion Bond: The Greek yogurt or mayonnaise acts as a secondary emulsifier, preventing the cream cheese from breaking and becoming oily under high heat. This ensures the filling stays velvety rather than separating into fats and solids.
| Filling Thickness | Internal Temperature | Rest Time | Visual Cue |
|---|---|---|---|
| 1.5 cm spread | 74°C (if using raw) | 3 minutes | Cheese starts to bead at edges |
| 2 cm spread | 74°C (if using raw) | 4 minutes | Tortilla shows dark golden spots |
| 3 cm spread | 74°C (if using raw) | 5 minutes | Center feels firm when pressed |
When you are preparing the chicken, the size of the pieces dictates the structural integrity of your wrap. Finely diced or shredded chicken increases the surface area, allowing every single morsel to be coated in the garlic infused cream.
This creates a cohesive "log" of filling that won't tumble out when you take your first bite.
Component Analysis of Essential Filling Ingredients
| Ingredient | Science Role | Pro Secret |
|---|---|---|
| Cream Cheese | Fat based binder | Use full fat for a richer mouthfeel and better stability |
| Garlic Cloves | Aromatic base | Microplane the garlic to distribute flavor without chunky bites |
| Smoked Paprika | Flavor depth | Toast the paprika in the dry pan briefly to wake up the oils |
| Flour Tortilla | Structural starch | Heat the tortilla for 10 seconds before folding to prevent tearing |
It is vital to use ingredients at the right temperature to ensure everything incorporates smoothly. Similar to the creamy base used in our Street Corn Chicken recipe, the ratio of fat to acid here is what keeps the chicken from feeling dry.
Selecting Every Element for Savory Success
- 300g Cooked chicken breast: Use rotisserie chicken for a deeper flavor. Why this? Shredded breast meat absorbs the garlic cream more efficiently than chunks.
- Substitute: Thigh meat. It provides a more succulent, though slightly greasier, result.
- 115g Cream cheese: Ensure it is softened. Why this? Cold cream cheese will clump and leave "cold spots" in the wrap.
- Substitute: Mascarpone for a milder, sweeter, and more luxurious texture.
- 60g Plain Greek yogurt or Mayonnaise: Provides necessary acidity. Why this? This thins the filling just enough to make it spreadable.
- Substitute: Sour cream. It adds a traditional tangy note similar to old-fashioned dips.
- 3 cloves Garlic, minced: The soul of the dish. Why this? Fresh garlic provides a sharp bite that powder cannot replicate.
- Substitute: Roasted garlic paste for a mellow, caramelized sweetness.
- 1 tsp Smoked paprika: Adds a woody, campfire note.
- 1/2 tsp Onion powder: Rounds out the savory profile.
- 1/2 tsp Sea salt: Enhances every other flavor.
- 1 tbsp Buffalo hot sauce: Just enough for a background hum of heat.
- 4 Large flour tortillas (10 inch): The canvas for our meal.
- 150g Shredded Mozzarella or Monterey Jack: For the ultimate cheese pull.
- 2 tbsp Fresh parsley: Adds a hit of grassy freshness.
- 1 tbsp Unsalted butter or Olive oil: To achieve the golden crust.
Standard Tools for a Professional Result
You don't need a professional kitchen to make these, but a heavy bottomed pan is non negotiable. I prefer a cast iron skillet because it holds heat evenly, which is the secret to getting that uniform golden color on the tortilla.
If you use a thin aluminum pan, you'll likely end up with burnt spots and a cold center, which is a tragedy we want to avoid.
A sturdy spatula is also your best friend here. You need something thin enough to slide under the wrap but strong enough to flip it without the whole thing unraveling. I've tried using tongs in the past, and let me tell you, it's a messy mistake.
Stick to a wide spatula to support the weight of the filling while you turn them.
Detailed Steps for the Golden Toasted Finish
- Soften the base. Combine the 115g cream cheese and 60g yogurt in a bowl until no lumps remain. Note: Using a fork helps mash the cream cheese into the yogurt for a silky texture.
- Infuse aromatics. Stir in the 3 minced garlic cloves, 1 tsp smoked paprika, 1/2 tsp onion powder, 1/2 tsp salt, and 1 tbsp Buffalo sauce. Wait for the sharp, peppery aroma to fill the air.
- Fold the protein. Add the 300g cooked chicken and 2 tbsp chopped parsley to the cream mixture, stirring until every strand of chicken is coated.
- Warm the tortillas. Heat your 4 tortillas in the microwave for 15 seconds until they are pliable and soft to the touch.
- Layer the filling. Spread the chicken mixture in the center of each tortilla, then top with 150g of shredded mozzarella. Note: Keep the filling 2 inches from the edges to ensure a clean fold.
- Secure the wrap. Fold in the sides and roll tightly from the bottom. Hear the faint crinkle of the flour as it stretches over the filling.
- Heat the skillet. Add 1 tbsp butter to the pan over medium heat until it sizzles and begins to foam slightly.
- Sear the seam. Place the wraps seam side down first. Listen for the immediate hiss of the tortilla hitting the hot fat.
- Toast to golden. Cook for 2 minutes per side until the exterior is shattering crisp and deep mahogany in color.
- Rest and serve. Let them sit for 3 minutes before slicing to allow the cheese to set.
Addressing Kitchen Hurdles and Texture Issues
One of the biggest frustrations is when the tortilla splits open during the frying process. This usually happens because the tortilla was too dry or it was overstuffed. If you find your wraps are cracking, try covering the tortillas with a damp paper towel before warming them up.
This injects just enough moisture into the flour to make it behave.
Why Your Wrap Is Sogginess
If the bottom of your wrap feels soft or damp, you likely didn't have the pan hot enough when you started, or you didn't drain your chicken well enough. Moisture is the enemy of a good crunch. Always make sure your skillet is preheated if the butter isn't foaming, don't put the food in yet.
| Problem | Root Cause | Solution |
|---|---|---|
| Tortilla stays pale | Heat too low | Increase to medium high and use more butter |
| Filling is cold | Cooked too fast | Reduce heat and cover with a lid for 1 minute |
| Filling leaks out | Loose fold | Place a heavy plate on top during the sear to press seams |
Common Mistakes Checklist
- ✓ Always place the wrap seam side down first to "glue" it shut with heat.
- ✓ Don't skip the resting period the cheese needs a moment to bond the chicken together.
- ✓ Pat the chicken dry if it was stored in liquid or broth to prevent a watery filling.
- ✓ Avoid overfilling; it’s better to have a slightly thinner wrap that stays closed than a giant one that explodes.
- ✓ Use a neutral oil or butter; extra virgin olive oil has a low smoke point and can turn bitter here.
Adjusting Flavors for Every Family Member
If you are cooking for a larger crowd, scaling this recipe is quite simple. Because the filling is essentially a stable spread, it handles being doubled or tripled very well. Just remember that the more you put in the pan, the more the temperature will drop. Cook in batches rather than crowding them all in at once.
For a smaller portion, say for a solo lunch, you can make the filling and keep it in a sealed container. When you're ready, just spread it and sear. It is much better to sear them fresh than to reheat a fully cooked wrap, as the tortilla will never quite regain that initial shattering crunch. If you love the flavors here, you might also enjoy the zestiness of our Cowboy Butter Chicken recipe, which uses a similar garlic forward profile.
| Fresh Method | Shortcut Method | Result Difference |
|---|---|---|
| Mincing fresh garlic | Garlic powder (1.5 tsp) | Fresh is sharper; powder is more uniform |
| Searing in butter | Toasting in a dry pan | Butter adds a nutty, rich flavor and better color |
| Home shredded cheese | Pre shredded cheese | Home shredded melts much smoother due to lack of starch |
Preserving Freshness for Tomorrow's Lunch
- Storage: Store any leftover filling in an airtight container in the fridge for up to 3 days. Do not store assembled, unsearched wraps for more than a few hours, or the tortilla will absorb the moisture from the yogurt.
- Freezing: You can freeze the assembled wraps before searing. Wrap them individually in foil and then place them in a freezer bag for up to 2 months. Thaw completely in the fridge before searing in a pan.
- Reheating: To get the crunch back, avoid the microwave. Use a toaster oven or a dry skillet over medium heat for about 3 minutes per side.
- Zero Waste: If you have leftover filling but no tortillas, it makes an incredible hot dip. Just put it in a small oven safe dish, top with extra cheese, and bake until bubbly. Serve with crusty bread or crackers.
Hearty Pairings for a Complete Family Meal
I love serving these with something bright to cut through the richness of the cream cheese. A simple side salad with a lemon vinaigrette or some pickled red onions works wonders. If you want to lean into the comfort aspect, a bowl of tomato soup is the perfect partner for dipping.
Chef's Note: If you want an even crispier finish, lightly brush the outside of the tortilla with a mix of melted butter and a pinch of garlic salt before it hits the pan. It creates a seasoned crust that is absolutely addictive.
Flour Tortilla and Garlic Myths
One thing I hear a lot is that you should never use "raw" garlic in a filling like this because it will be too spicy. That isn't true! Because we sear the wrap for a few minutes on each side, the garlic inside gets just enough heat to take the raw edge off while still providing a bold, punchy flavor.
Another myth is that you can't get a crispy wrap without deep frying. Total nonsense. A medium hot pan and a tablespoon of butter will give you a crust that is just as satisfying without the heavy oiliness.
The Maillard reaction that browning of the flour and milk solids in the butter is where all the flavor lives anyway. Focusing on that contact between the tortilla and the hot pan is the real secret.
Helping You Solve Common Kitchen Problems
| Problem | Cause | Fix |
|---|---|---|
| Cheese is not melted | Filling was too cold | Let filling sit at room temp for 15 mins before wrapping |
| Tortilla is chewy | Not enough fat in pan | Add another teaspoon of butter for the second side |
| Garlic is bitter | Garlic was burnt | Don't let the garlic touch the pan directly; keep it inside the wrap |
If you want a smokier profile, add a touch more paprika and perhaps a drop of liquid smoke to the filling. If you want more crunch, add some finely diced celery or bell pepper to the chicken mix for a refreshing snap.
If you want a lighter version, swap the cream cheese for a low-fat Neufchatel and use a whole wheat wrap, though the texture will be slightly grainier.
These Cheesy Garlic Chicken Wraps are more than just a quick meal; they are a testament to how simple ingredients can create a truly hearty experience. The way the garlic mellows into the cream cheese, paired with that golden, crackling shell, makes it a recipe you'll find yourself coming back to whenever you need a little bit of home on a plate.
Enjoy the process, and most importantly, enjoy that first, crunchy, cheesy bite.
Commonly Asked Questions
Troubleshooting Common Issues
| Issue | Solution |
|---|---|
| Make these in an air fryer | Yes, you certainly can. Lightly spray the outside of the wraps with oil and air fry at 200°C for about 6 to 8 minutes, flipping halfway through. It results in a very even, dry crunch, though you do lo |
| Possible to use flour other than wheat for the wraps | You can use gluten-free wraps, but be aware that they are often much more brittle. You will need to steam them for a good 30 seconds to make them pliable enough to fold without shattering. Corn tortil |
| What kind of chicken works best | While I recommend cooked breast meat, any leftover poultry will work. Turkey is a fantastic substitute around the holidays. The key is to ensure the meat is shredded finely enough so it doesn't create |
| Skip the Buffalo sauce | Absolutely. If you are sensitive to heat, you can replace it with a teaspoon of Worcestershire sauce or even a bit of Dijon mustard. Both will provide that necessary acidic "lift" to balance the heavy |
| Cream cheese still lumpy | This usually happens if the cream cheese was too cold when you started mixing. If you're in a rush, you can pop the cream cheese in the microwave for 10-15 seconds to take the chill off. Just don't le |

HIGH in Sodium
1085 mg mg of sodium per serving (47% % of daily value)
The American Heart Association recommends limiting sodium intake to about 2,300mg per day.
Tips to Reduce Sodium in Your Buffalo Chicken Wraps
-
Low-Sodium Cheese-15%
Replace regular Mozzarella or Monterey Jack cheese with a low-sodium or reduced sodium version. This can significantly cut down on the overall sodium content.
-
Skip the Salt-25%
Omit the added sea salt from the recipe. The other ingredients already contribute sodium, and you may not miss it.
-
Unsalted Chicken-10%
Ensure your cooked chicken breast is prepared without added salt or sodium containing seasonings. Look for fresh, unseasoned chicken when purchasing.
-
Low-Sodium Hot Sauce-20%
Check the label of your buffalo hot sauce and choose a low-sodium alternative, or use a smaller amount to control the sodium intake.
-
Flavor with Herbs & Spices
Enhance the flavor with fresh herbs and spices like black pepper, garlic powder (instead of garlic salt), and dried oregano. This will boost the taste without adding sodium.
Recipe FAQs
What cheese goes with chicken wraps?
Shredded mozzarella or Monterey Jack are ideal. These cheeses melt beautifully, offering a satisfying stretch and creamy texture that complements the garlic chicken filling without overpowering it.
What to put in a garlic Chicken Wrap?
A creamy garlic infused filling is key. Combine cooked, shredded chicken with softened cream cheese, Greek yogurt or mayonnaise for tang, minced garlic, smoked paprika, onion powder, salt, and a hint of hot sauce. Add shredded cheese for meltiness and fresh parsley for brightness.
What dipping sauce is best with cheesy wraps?
A cool, tangy ranch or a zesty sour cream dip works well. These sauces provide a refreshing contrast to the rich, cheesy, and garlicky flavors of the wrap, balancing the overall taste profile.
What kind of sauce is good in a Chicken Wrap?
A creamy, savory sauce is best. For these wraps, a base of cream cheese mixed with garlic, yogurt or mayonnaise, and seasonings creates a rich, cohesive filling that coats the chicken perfectly.
Can I make these wraps ahead of time?
Yes, but sear them just before serving for best results. You can prepare the filling and store it separately in the refrigerator for up to 3 days. Assemble and sear the wraps closer to mealtime to maintain the tortilla's crispiness.
How to prevent the wrap filling from leaking out?
Fold the sides in tightly and don't overfill. Ensure the filling is spread evenly towards the center, leaving about a 2 inch border on the sides. Rolling it from the bottom while tucking in the sides creates a secure pocket.
Is it true you need to use raw garlic for flavor?
Yes, fresh minced garlic provides the best bold flavor. While raw garlic can be pungent, the searing process mellows its sharp edge, infusing the creamy filling with a delicious, aromatic garlic essence.
Cheesy Garlic Chicken Wraps

Ingredients:
Instructions:
Nutrition Facts:
| Calories | 581 kcal |
|---|---|
| Protein | 40g |
| Fat | 29g |
| Carbs | 38g |
| Fiber | 2g |
| Sugar | 2g |
| Sodium | 1085mg |
