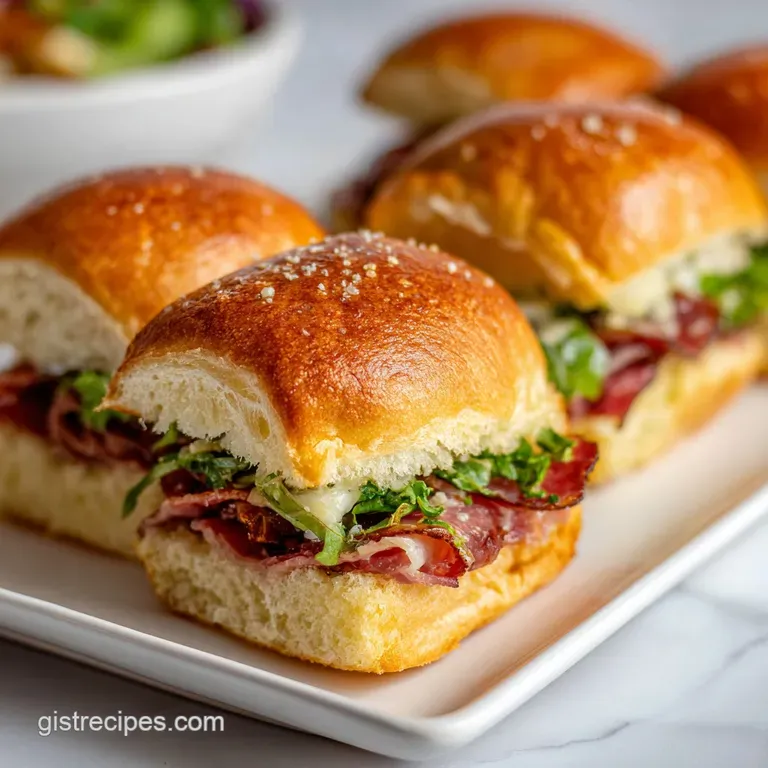
Italian Grinder Sliders: Hot and Savory
- Time: Active 20 minutes, Passive 20 minutes, Total 40 minutes
- Flavor/Texture Hook: A buttery, garlic crusted exterior that gives way to velvety melted provolone and a crisp, tangy salad.
- Perfect for: Game day parties, quick hits for dinner, or making a bold impression at any social gathering.
- Why Everyone is Obsessed With These Italian Grinder Sliders
- How the Temperature Contrast Creates Viral Flavor
- The Most Critical Elements for Big Flavors
- Choosing the Best Meats for Big Flavors
- Kitchen Essentials for Quick Party Finger Foods
- Master the Assembly for Maximum Flavor Impact
- Expert Fixes for Soggy or Dry Sliders
- Simple Ways to Adapt This Party Favorite
- No More Common Sandwich Myths
- Fresh Storage and Zero Waste Scraps Guide
- Bold Pairings for Your Mini Deli Sandwiches
- Very High in Sodium
- Recipe FAQs
- 📝 Recipe Card
Why Everyone is Obsessed With These Italian Grinder Sliders
Forget everything you’ve been told about keeping your hot foods and cold foods on separate plates. The big myth people believe is that a sandwich has to be one or the other either a toasted sub or a cold deli wrap. That logic is exactly why most home cooked sandwiches feel a bit flat.
These sliders blow that theory out of the water by smashing those two worlds together. We are taking the heavy, salty hitters like Genoa salami and pepperoni, melting them into a gooey cheese blanket, and then hitting them with a cold, vinegar spiked salad that wakes up every single taste bud you own.
You know that specific sizzle when melted butter hits a hot baking dish? That’s the first sign you’re doing something right here. When I first tried this, I was worried the rolls would turn into a mushy mess once the lettuce went on.
But the secret is all in the timing and the "cheese shield." We aren't just making a sandwich; we're building a structural masterpiece that stays crispy on the outside and juicy on the inside.
It’s internet famous for a reason it’s loud, it’s messy in the best way, and the flavors are unapologetically big.
If you’re looking for a quiet, subtle meal, look elsewhere. These are designed for those moments when you want a quick hit of intense flavor. The aroma of garlic and oregano wafting from the oven is enough to bring everyone into the kitchen before the timer even goes off.
We’re talking about a velvety texture from the mayo based dressing clashing against the shatter crisp top of a Hawaiian roll. It’s a total vibe, and honestly, you'll never look at a standard deli tray the same way again.
How the Temperature Contrast Creates Viral Flavor
Structural Integrity: Placing the cheese directly against the bread creates a moisture barrier that prevents the fats from the meat and the moisture from the salad from soaking into the bun.
Acidic Balance: The red wine vinegar in the salad dressing provides a sharp contrast to the high fat content of the salami and pepperoni, cleaning the palate between bites.
Maillard Magic: Brushing the tops with a garlic parmesan butter glaze triggers browning at 350°F, creating a savory crust that smells like a high end pizzeria.
Thermal Shock: Adding the cold, crisp iceberg lettuce to the hot, melted sandwiches provides a sensory "pop" that makes the flavors feel brighter and more intense.
| Component Thickness | Internal Target | Rest Time | Visual Cue |
|---|---|---|---|
| 1 inch meat stack | 145°F (63°C) | 3 minutes | Cheese is translucent and bubbling |
| 1.5 inch meat stack | 150°F (66°C) | 5 minutes | Bun edges are dark golden brown |
| 0.5 inch meat stack | 140°F (60°C) | 2 minutes | Butter glaze is fully absorbed |
The table above helps you decide how long to let things hang out based on how thick you pile your deli meats. If you're going for a massive stack, you'll want that extra rest time so the heat distributes evenly without burning the tops of your rolls.
The Most Critical Elements for Big Flavors
Getting the right ingredients is the difference between a soggy roll and a viral success. We aren't just throwing meat on bread; we are selecting components that play specific roles in the flavor map.
The Hawaiian rolls provide that hint of sweetness to counter the salt, while the pepperoncinis add a fermented funk that you just can't get from plain pickles.
| Ingredient | Science Role | Pro Secret |
|---|---|---|
| Hawaiian Rolls | Sugar content aids in rapid browning | Use a long serrated knife for a perfectly flat horizontal cut |
| Provolone | High fat meltability creates the "shield" | Get the non smoked version to let the meat flavors shine |
| Red Wine Vinegar | Breaks down the heavy mayo fats | Whisk with the spices first to bloom the dried oregano |
| Pepperoni | Releases spicy oils during the bake | Use sandwich style large rounds for better coverage |
While we're talking about flavor layers, you should know that the fats in the salami and ham will actually season the bread from the inside out as they heat up. This is why we don't need to over salt the meat itself. If you're looking for another way to use these flavors in a different format, you might want to try an Italian Grinder Pasta Salad for your next meal prep session. It uses the same logic of acid vs. fat but in a cold noodle form.
Choosing the Best Meats for Big Flavors
To make the best version of this dish, you need to be specific about your shopping list. Don't just grab "generic ham." Go for the thinly sliced deli ham that has a bit of sweetness to it.
For the salami, Genoa is the gold standard here because it has a higher fat content which renders out beautifully in the oven, creating a silky mouthfeel.
- 1/2 lb thinly sliced deli ham
- Provides the salty, meaty foundation.
- 1/4 lb Genoa salami
- Adds a rich, fermented depth.
- 1/4 lb sandwich style pepperoni
- Brings the heat and those iconic spicy oils.
- 200g provolone cheese, sliced
- This is your glue and your moisture barrier.
- 2 cups iceberg lettuce
- You need the water content and crunch of iceberg; don't swap for romaine.
- 1/4 cup mayonnaise
- This creates a velvety dressing that binds the salad.
- 2 tbsp red wine vinegar
- The essential acid to cut through the deli fats.
- 1/4 cup sliced pepperoncinis
- Drained and chopped for a vinegary bite.
- 4 tbsp unsalted butter
- Melted to carry the aromatics into the bun crevices.
- 2 cloves garlic
- Minced into a paste so you don't get raw chunks.
- 1 tbsp fresh parsley
- For a pop of color and freshness.
- 2 tbsp grated Parmesan cheese
- Adds a salty, umami crust to the top.
| Original Ingredient | Substitute | Why It Works |
|---|---|---|
| Provolone | Mozzarella | Similar meltability. Note: Lacks the sharp tang of provolone. |
| Red Wine Vinegar | Apple Cider Vinegar | High acidity levels. Note: Adds a fruitier, sweeter undertone. |
| Deli Ham | Roast Turkey | Leaner protein source. Note: Result will be slightly drier. |
If you find yourself running low on the specific deli meats, don't sweat it. The beauty of these sliders is that they are incredibly forgiving. You can even pivot the whole concept toward something like a Baked Italian Sub Sandwich if you have long hoagie rolls instead of the small sweet buns.
Kitchen Essentials for Quick Party Finger Foods
You don't need a professional kitchen to pull this off, but a couple of specific tools will make your life much easier. First, a 9x13 inch baking dish is non negotiable. It keeps the rolls snug so the butter glaze doesn't just run off to the sides; it forces the flavor into the bread.
Second, get a long serrated knife like a bread knife. Trying to cut a whole sheet of Hawaiian rolls with a small utility knife is a recipe for a jagged, uneven mess. You want one clean, horizontal slice so the top and bottom are perfectly flat. This ensures every slider has the same ratio of meat to bread.
Finally, a small silicone pastry brush is a total game changer for the garlic butter. You want to paint that flavor into every nook and cranny. If you just pour the butter over the top, some rolls will be drenched while others are dry. We're looking for total coverage here for that internet famous golden glow.
Master the Assembly for Maximum Flavor Impact

- Slice the entire block of Hawaiian rolls in half horizontally. Note: Keep the rolls connected to make layering faster and more even.
- Place the bottom slab into your 9x13 inch baking dish. Note: This keeps the structure contained during the "cheese shield" phase.
- Layer half of the provolone cheese across the bottom buns. Note: This creates a fat proof barrier so the bread doesn't get soggy.
- Top with the layers of deli ham, then the Genoa salami, and finally the pepperoni. Watch for total coverage so every bite is loaded.
- Place the remaining provolone cheese slices over the meat and cover with the top half of the rolls.
- Whisk together the melted butter, garlic paste, parsley, and Parmesan. Brush this liberally over the tops. Observe the butter soaking in.
- Cover the dish tightly with aluminum foil and bake at 350°F (175°C) for 10 minutes. Note: This steams the meat and melts the cheese without burning the bread.
- Remove the foil and bake for another 5-8 minutes until the tops are golden and crackling.
- While the rolls bake, whisk the mayo, vinegar, and spices, then fold in the lettuce and pepperoncinis.
- Remove the top bun layer, spread the cold salad over the hot meat, replace the tops, and slice. Listen for the crunch as you cut.
Chef's Tip: Freeze your butter for 10 minutes before melting it with the garlic; it helps the garlic flavor infuse more deeply without the milk solids burning too quickly.
Expert Fixes for Soggy or Dry Sliders
Why Your Sliders Turned Out Soggy
The most common culprit for a mushy slider is skipping the bottom layer of cheese. When the deli meats heat up, they release moisture and oils. If that liquid hits the bread directly, it acts like a sponge. Another reason could be adding the salad while the meat is still piping hot and then letting it sit.
The steam from the meat will wilt the lettuce and turn the dressing into a liquid.
| Problem | Root Cause | Solution |
|---|---|---|
| Soggy Bottoms | Meat juices soaked into bread | Always place a layer of cheese down before the meat. |
| Wilted Salad | Heat from meat steamed the lettuce | Wait 2 mins after baking before adding the cold salad. |
| Burnt Tops | Sugar in rolls caramelized too fast | Keep covered with foil for the first 10-12 minutes. |
Common Mistakes Checklist
- ✓ Don't drain the pepperoncinis over the bread; chop them on a separate board to keep the buns dry.
- ✓ Ensure your oven is fully preheated to 350°F (175°C) before the rolls go in.
- ✓ Use a serrated knife for the final cut to avoid squishing the rolls and losing the salad.
- ✓ Pat the shredded lettuce dry if it’s freshly washed; excess water is the enemy of a crisp slider.
Why the meat is sliding out when I cut them?
This usually happens because the cheese hasn't fully melted to act as a "glue," or you're using a dull knife. When the provolone is properly melted, it grips the meat and the bread together. If you find the layers shifting, give the sandwiches a 3 minute rest after the final bake.
This allows the proteins to settle and the cheese to firm up just enough to hold everything in place while you slice through the rolls.
Simple Ways to Adapt This Party Favorite
When you need to scale this recipe up for a huge crowd, the math is simple, but the technique changes slightly. For a double batch (24 sliders), don't try to cram two sheets of rolls into one pan. Use two separate 9x13 dishes.
If you try to bake them too close together, the sides won't get that slightly crispy, toasted texture.
Scaling Down (6 Sliders) If you're just cooking for two, cut the roll sheet in half before you start. Use a smaller toaster oven safe dish. You’ll want to reduce the baking time by about 20% because there’s less thermal mass in the oven.
For the dressing, since it uses a small amount of egg (in the mayo), just stick to the measurements provided; a little extra dressing never hurt anyone!
Scaling Up (24+ Sliders) When doubling or tripling, keep your spices to about 1.5x the original amount rather than a straight double. Spices like red pepper flakes can become overwhelming when multiplied. Also, work in batches for the salad.
Lettuce starts to lose its "shatter" the moment it hits the vinegar, so only mix as much salad as you’re going to serve immediately.
| Servings | Roll Count | Pan Size | Cook Time |
|---|---|---|---|
| 6 People | 12 Rolls | 9x13 inch | 20 minutes |
| 12 People | 24 Rolls | Two 9x13 inch | 25 minutes |
| 18 People | 36 Rolls | Three 9x13 inch | 28 minutes |
If you love the flavor profile but want something even faster, you can skip the oven entirely and make these as cold sandwiches, but you'll lose that "viral" contrast of the melted cheese and toasted garlic butter.
No More Common Sandwich Myths
Myth: You should toast the buns before adding the meat. Actually, doing this makes the bread too hard. The Hawaiian rolls are soft and pillowy; we want them to toast with the garlic butter on top and the cheese protection on the bottom.
This creates a gradient of texture rather than a uniform "crunch" that might scrape the roof of your mouth.
Myth: Salami and pepperoni don't need to be cooked. While they are cured and safe to eat cold, heating them up is what releases the aromatic oils. This "blooms" the spices inside the meat, which then soaks into the bread and the cheese.
If you don't bake them, you're missing out on 50% of the flavor profile.
Myth: Mayo makes the sandwich soggy. In this specific recipe, the mayo in the salad dressing actually acts as a fat based barrier. Because oil and water don't mix, the fat in the mayo helps keep the vinegar from immediately soaking into the lettuce, keeping it crispier for longer.
Fresh Storage and Zero Waste Scraps Guide
Storage Guidelines These sliders are best eaten fresh because of the cold salad component. However, if you have leftovers, store the meat and cheese rolls in an airtight container in the fridge for up to 3 days. Tip: Remove the salad layer before storing if possible.
The lettuce will not survive the reheating process and will turn bitter and slimy.
Freezing Instructions You can freeze the assembled meat and cheese sliders before baking and before adding the garlic butter. Wrap them tightly in plastic wrap and then foil. They will stay fresh for up to 2 months.
When you're ready to eat, thaw them in the fridge overnight, apply the garlic butter, and bake as directed. Never freeze the salad or the mayo based dressing.
Zero Waste Tips Don't throw away the ends of the iceberg lettuce or the parsley stems. The stems can be finely minced and added to the garlic butter for extra flavor. Any leftover meat or cheese scraps can be chopped up and thrown into a morning omelet or used as a topping for a quick Alfredo Tortellini Bake to add a salty, Italian punch. Even the leftover pepperoncini brine in the jar is liquid gold use it to marinate chicken or add a splash to your next martini.
Bold Pairings for Your Mini Deli Sandwiches
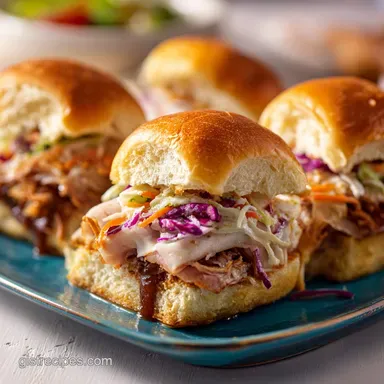
To round out the meal, you need sides that can stand up to the high intensity flavors of the grinder salad. Since the sliders are rich and salty, I love pairing them with something slightly sweet or very crisp.
A simple vinegar based coleslaw or even some sea salt kettle chips provides that extra crunch that makes the whole meal feel like a deli experience.
If you’re serving these at a party, think about the drink pairings. The high fat and salt content means you want something with high carbonation or acidity. A crisp pilsner or a sharp ginger ale works wonders at cutting through the mayo and salami.
For those who want a full Italian themed spread, you can't go wrong by serving these alongside some Crispy Mozzarella Sticks. It leans into the cheese heavy, fun finger food vibe that makes these sliders so viral in the first place. Whether it's a casual Tuesday or a huge Super Bowl bash, these sandwiches are designed to be the star of the show, so keep the sides simple and let the grinder sliders do the heavy lifting.

Very High in Sodium
895 mg of sodium per serving (39% of daily value)
The American Heart Association recommends limiting sodium intake to no more than 2,300mg per day, with an ideal limit of under 1,500mg for most adults.
Tips to Reduce Sodium
-
Choose Lower Sodium Deli Meats-25%
Replace the regular deli ham, Genoa salami, and pepperoni with low-sodium varieties. This is the biggest source of sodium in this recipe.
-
Opt for Reduced Sodium Cheese-15%
Switch to a reduced sodium provolone cheese. While cheese contributes to sodium, this is a good way to slightly decrease it.
-
Rinse Pepperoncini-10%
Thoroughly rinse the sliced pepperoncinis under cold water before chopping and adding them to the recipe to remove excess brine.
-
Embrace Herbs and Spices
Continue to use generous amounts of dried oregano, red pepper flakes, and fresh parsley. They add flavor without adding sodium.
-
Use Unsalted Butter
You are already using unsalted butter, which is excellent. Continue to do so.
-
Dilute Mayonnaise and Vinegar-5%
Consider using a light mayonnaise and ensure the red wine vinegar is not high in sodium. If using a pre-made dressing base, check its sodium content.
Recipe FAQs
What exactly are Italian grinder sliders?
These are miniature, oven baked versions of the classic deli sandwich. They feature layers of ham, salami, and pepperoni on Hawaiian rolls, finished with a crisp, tangy, mayo based lettuce salad.
What meat is on the Italian Grinder Sandwich?
Why is an Italian sandwich called a grinder?
No, this is a common misconception regarding the name origin. While many people think it refers to the toasted bread being difficult to chew, it is actually a regional term from the East Coast for a sub sandwich that is toasted or heated, rather than served cold.
How to keep the Hawaiian rolls from getting soggy?
Layer the provolone cheese on the bottom buns first to create a moisture barrier. Additionally, ensure your shredded lettuce is completely patted dry before mixing it with the mayo and vinegar dressing, as excess water will ruin the texture.
How to achieve the perfect golden brown topping?
Brush the melted butter, garlic, and Parmesan mixture liberally over the tops before baking. If you enjoyed mastering this crispy crust technique here, you can apply similar heat management principles when baking dough based meals to ensure consistent browning.
How to bake the sliders properly?
Cover the dish with foil and bake at 350°F (175°C) for 10-12 minutes, then remove the foil and bake for 5-8 more minutes. This method ensures the meat and cheese are hot and melted while keeping the buns soft and golden.
Is it necessary to add the cold salad after baking?
Yes, adding the dressed lettuce mixture last is essential for the authentic grinder experience. If you were to bake the lettuce, it would wilt and release moisture, destroying the contrast between the hot, buttery bread and the cool, crunchy salad topping.
Italian Grinder Sliders
Ingredients:
Instructions:
Nutrition Facts:
| Calories | 327 kcal |
|---|---|
| Protein | 13.9 g |
| Fat | 22.5 g |
| Carbs | 17.8 g |
| Fiber | 0.8 g |
| Sugar | 4.9 g |
| Sodium | 895 mg |
