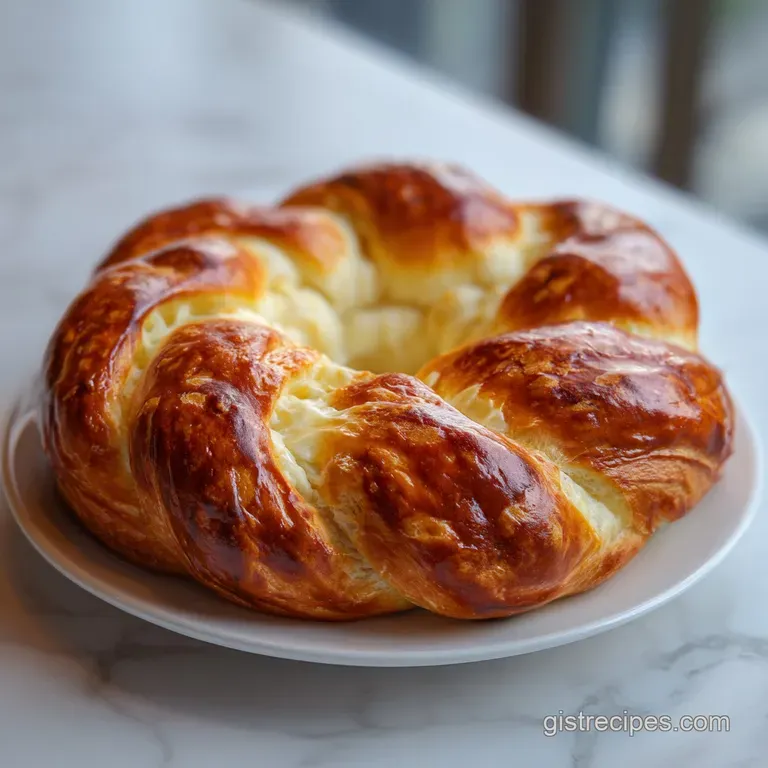
Traditional Rosca De Reyes Bread
- Time: Active 40 minutes, Passive 3 hours 30 mins, Total 4 hours 10 mins
- Flavor/Texture Hook: Buttery, citrus perfumed crumb with a sugary, crisp topping.
- Perfect for: Three Kings Day celebrations, weekend brunch, or festive family gatherings.
- Baking the Traditional Rosca de Reyes
- The Physics of the Brioche Rise
- Recipe Details and Timing Breakdown
- Component Analysis and Selection
- Necessary Tools for Bread Success
- Step by Step Baking Guide
- Fixing Common Yeast Dough Errors
- Clever Swaps and Flavor Twists
- Storing and Repurposing Leftover Slices
- Best Drinks for Dipping Slices
- Why Pay $40 at the Bakery?
- Rosca de Reyes FAQs
- 📝 Recipe Card
Baking the Traditional Rosca de Reyes
The first time I tried to bake this, my kitchen smelled like a dream but my bread looked like a flat tire. I remember standing over my counter at 2 AM, flour in my hair, wondering why my dough hadn't doubled in size. It was freezing in my apartment, and I had killed the yeast with milk that was way too hot.
Since then, I’ve learned that this bread isn't just about mixing ingredients; it’s about patience and respecting the temperature of your kitchen.
When you pull a successful ring out of the oven, the aroma of orange zest and warm butter hits you like a soft wool blanket. There’s nothing quite like the sound of that sugary crust the "costra" giving way with a gentle snap as you slice into the velvety interior.
It’s a labor of love that turns a simple morning coffee into a celebration of heritage and family, and honestly, the store-bought versions just can't compete with the fresh, zesty crumb you get at home.
The Physics of the Brioche Rise
Lipid Interference: High fat content from butter and eggs slows down yeast activity by coating the flour proteins, requiring a longer rise for a light structure. This slow fermentation creates a complex, honeyed flavor profile that lean doughs simply lack.
| Method | Total Time | Final Texture | Best For |
|---|---|---|---|
| Standard Oven | 4 hours 10 mins | Airy, pull apart crumb | Traditional holiday presentation |
| Slow Cold Rise | 18 hours | Dense, deeply flavorful | Stress free morning baking |
| Stovetop Steam | 55 minutes | Moist, cake like | Smaller portions without oven |
Choosing the right method depends on how much time you have to watch the dough grow. If you want that classic, golden brown exterior that shatters slightly under the knife, the oven is your best friend.
The dry heat allows the sugars in the egg wash to caramelize, creating a beautiful mahogany finish that holds up the heavy candied fruit.
Recipe Details and Timing Breakdown
Getting the timing right is the hardest part of working with enriched doughs. We aren't just making a quick bread; we are cultivating a living culture that needs warmth and sugar to thrive.
You’ll spend about 40 minutes actually touching the dough, but the real magic happens while you're sitting on the couch waiting for the yeast to breathe.
If you are a beginner, don't rush the kneading process. It takes time for those gluten strands to become strong enough to hold the weight of the butter. I usually set a timer for the kneading stage just to make sure I don't quit early because my arms are tired.
Trust me, the result is a crumb that feels like a cloud rather than a dense brick.
Component Analysis and Selection
| Ingredient | Science Role | Pro Secret |
|---|---|---|
| Whole Milk | Softens the gluten structure | Warm it to exactly 105°F to wake yeast without killing it |
| Orange Blossom Water | Provides volatile aromatic compounds | Add it last to prevent the scent from evaporating during mixing |
| Unsalted Butter | Shortens gluten strands for tenderness | Grate frozen butter into the dough for faster, even integration |
Using high-quality butter is non negotiable here. Since it makes up a massive part of the flavor profile, using a cheap brand with high water content will leave you with a greasy dough that doesn't rise properly. Look for butter with at least 82% fat for that professional, silky mouthfeel.
Necessary Tools for Bread Success
You don't need a professional bakery to pull this off, but a few specific tools make the process way less stressful. A heavy duty stand mixer (like a KitchenAid) is a lifesaver for the long kneading process. If you're doing this by hand, prepare for a workout!
You'll also want a digital thermometer to check your milk temperature guessing is the fastest way to fail.
A large, rimmed baking sheet is essential to catch any stray sugar or fruit that might slide off during the bake. I also highly recommend using parchment paper rather than just greasing the pan.
It prevents the bottom from getting too dark and makes it much easier to slide the ring onto a cooling rack or serving platter without it breaking.
step-by-step Baking Guide
Bloom the yeast. Combine 1/2 cup whole milk (122g) with 1 tsp of the granulated sugar and 1 tbsp active dry yeast (9g). Note: Wait 10 minutes until a thick, foamy head forms on top.
Mix the dry base. In your mixer bowl, whisk together 4 cups of the all purpose flour (515g), 1/2 cup granulated sugar (100g), and 1/2 tsp sea salt (3g). Note: This ensures the salt doesn't touch the yeast directly and inhibit it.
Incorporate the aromatics. Add 3 large eggs (150g), 1 tbsp orange blossom water (15g), and 1 tbsp fresh orange zest (6g) to the yeast mixture, then pour into the flour. Note: Mixing the zest with the liquids helps distribute the oils evenly.
Knead and enrich. Mix on low until a shaggy dough forms, then gradually add 1/2 cup of the softened butter (113g), one tablespoon at a time. Note: Knead 10-12 minutes until the dough is silky and clears the sides.
The first proof. Place dough in a greased bowl, cover with a damp cloth, and let rise in a warm spot for 1 hour 30 mins. Note: It should look puffy and roughly double in size.
Shape the ring. Punch down the dough and roll into a long log on a floured surface, then join the ends to form a large oval. Note: Tuck the plastic baby figurines into the bottom of the dough now.
The second proof. Place the ring on a lined sheet, cover, and let rise for 45 minutes until it looks noticeably swollen. Note: Don't over proof or the decorations will sink in.
Create the sugar paste. Cream the remaining 1/2 cup butter (113g) with 1/2 cup confectioners' sugar (60g), 1 egg yolk (17g), and the remaining 1/2 cup flour (65g). Note: Mix until a thick, spreadable paste forms.
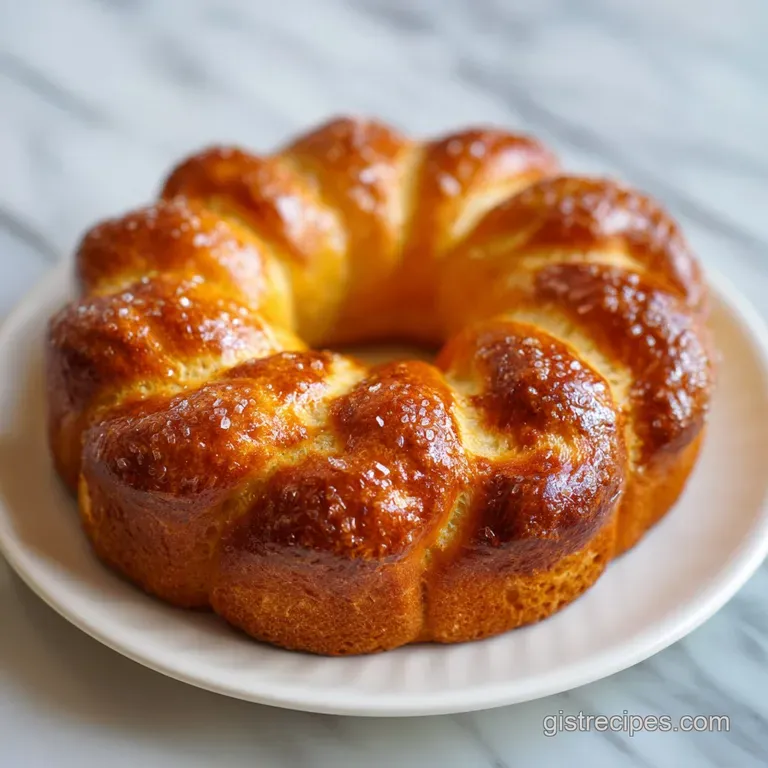
Decorate the top. Brush the ring with the beaten egg wash (50g), then alternate strips of the sugar paste and 100g candied fruit strips. Note: Press the fruit in firmly so it doesn't slide off.
Bake and cool. Bake at 350°F (180°C) for 30 mins until the crust is deep golden and sounds hollow when tapped. Note: Let it rest for 20 minutes before slicing.
Chef's Tip: Rub the orange zest into the granulated sugar with your fingertips before mixing. The friction releases the essential oils, scenting the entire dough more deeply than just tossing the zest in.
Fixing Common Yeast Dough Errors
If your dough isn't rising, it's usually a temperature issue. Yeast is like a person; it hates being too cold or too hot. If your kitchen is drafty, try putting the bowl inside an unlit oven with the oven light turned on. The heat from that tiny bulb is often enough to create a perfect fermentation chamber.
To Prevent a Dense Crumb
A heavy, leaden bread usually means the dough was under kneaded or the flour was packed too tightly into the measuring cup. Use a scale for the flour if you can. If the dough feels too stiff, add a teaspoon of milk at a time until it becomes supple and elastic.
| Problem | Root Cause | Solution |
|---|---|---|
| Dough is too sticky | High humidity or large eggs | Add flour 1 tbsp at a time during the final kneading |
| Toppings sliding off | Too much egg wash | Use a paper towel to dab excess wash before placing fruit |
| Bread is dry | Overbaking or too much flour | Pull from oven when internal temp hits 190°F |
Common Mistakes Checklist
- ✓ Use room temperature eggs to ensure they emulsify perfectly with the butter.
- ✓ Don't skip the "blooming" step for the yeast, even if using instant yeast.
- ✓ Avoid over flouring your work surface; the dough should be slightly tacky.
- ✓ Ensure the butter is truly softened, not melted, for the sugar paste.
- ✓ Preheat your oven for at least 20 minutes to ensure a steady temperature.
Clever Swaps and Flavor Twists
While the traditional candied fruit is a staple, many people find it a bit polarizing. I’ve seen versions using dried cranberries or even toasted pecans that work beautifully. Just remember that changing the moisture level of the toppings can affect how the dough rises under them.
If you want a different textural experience, you can play with the "costra" or sugar paste. Adding a teaspoon of cocoa powder to half the paste creates a beautiful striped effect that kids absolutely love. It gives a slight chocolatey bitterness that cuts through the heavy sugar of the candied cherries.
| Original Ingredient | Substitute | Why It Works |
|---|---|---|
| Orange Blossom Water | Vanilla Extract (1 tsp) | Provides a warm, familiar floral aroma. Note: Lacks the citrus punch of the original. |
| Candied Fruit | Dried Apricots/Dates | Similar chewiness without the artificial sweetness. |
| Whole Milk | Full fat Oat Milk | Maintains the necessary fat and sugar for the yeast to thrive. |
Storing and Repurposing Leftover Slices
This bread is best on the day it's made, but it keeps surprisingly well if you wrap it tightly in plastic. If it does get a bit stale after two or three days, don't throw it out! It makes the most incredible French toast you will ever eat.
The citrus and butter in the dough soak up the custard and caramelize beautifully in a pan.
For longer storage, you can freeze individual slices. Wrap them in foil and then place them in a freezer bag. When you're ready for a snack, just pop a slice into the toaster oven at 300°F for about 5 minutes.
It revives the "costra" and softens the crumb back to its original velvety state.
Best Drinks for Dipping Slices
In my house, we don't eat this bread without a big mug of Mexican hot chocolate. The cinnamon and dark cocoa in the drink are the perfect foil for the bright orange notes in the bread. If you're feeling adventurous, try a "café de olla" made with piloncillo and cloves.
The spice profile is a natural match for the enriched dough.
If you prefer something lighter, a strong Earl Grey tea also works well. The bergamot in the tea echoes the citrus in the Rosca de Reyes, creating a sophisticated pairing that isn't too heavy for a late afternoon snack.
Whatever you choose, make sure it's hot this bread was designed to be dipped and enjoyed slowly.
Decisions For Your Dough
- If you want a richer crumb, replace one egg with two extra egg yolks.
- If you want a crispier topping, add a pinch of cinnamon to the sugar paste.
- If you want a faster rise, use bread flour instead of all purpose.
Why Pay $40 at the Bakery?
There is a certain pride that comes with bringing a homemade ring to the table. Most grocery store versions are loaded with preservatives to keep them soft on the shelf for weeks, which usually means they have a weird, chemical aftertaste.
When you bake it yourself, you control the quality of the butter and the freshness of the zest.
The cost of these ingredients is surprisingly low compared to the price tags in a professional panadería. You're mostly paying for the labor of the kneading and the shaping. Once you realize how easy it is to do at home, you'll never go back to the boxed version.
Plus, you get to choose exactly how many plastic babies to hide just make sure your guests know to look out for them!
Flour and Yeast Myths
One common misconception is that you need "specialty" Mexican flour. In reality, standard all purpose flour works perfectly because it has just enough protein to provide structure without making the bread tough. Another myth is that you can't over knead by hand.
While difficult, it is possible to break the gluten bonds if you are using a high powered mixer for over 20 minutes, so stick to the suggested times. High heat does not make yeast work faster; it just kills it. Keep your milk lukewarm, not hot.

Rosca de Reyes FAQs
What is the tradition of Rosca de Reyes?
It commemorates the arrival of the Three Wise Men. The ring shape symbolizes a crown, and the hidden dry fava bean or small plastic baby represents the baby Jesus needing protection.
What does it mean when you get a baby in the Rosca?
You are expected to host the next celebration. Traditionally, the person finding the figure is obligated to host a gathering or buy tamales for the community on Candelaria (February 2nd).
What are you supposed to eat on 3 Kings Day?
Rosca de Reyes is the primary food consumed. This sweet, yeast bread is typically served alongside a hot beverage like Mexican hot chocolate or coffee.
What do Mexicans eat on Three Kings Day?
The traditional centerpiece is Rosca de Reyes. This sweet bread is flavored with orange blossom water and decorated with candied fruit meant to represent jewels on a crown.
How do I ensure my Rosca dough rises properly?
Warm the milk to exactly 105°F before activating the yeast. High fat doughs like this require patience, so place the covered bowl in a slightly warm, draft free spot for the proofing time.
Is it true I must use the same amount of candied fruit as the recipe suggests?
No, you can adjust the topping quantity to your preference. While the traditional look requires generous fruit, you can use less if you dislike overly sweet decorations, just ensure the weight doesn't drastically change the paste.
How should I store leftover Rosca de Reyes slices?
Wrap the bread tightly in plastic wrap immediately after it cools. If it becomes stale, it makes excellent French toast because the rich, buttery crumb soaks up custard well.
Traditional Rosca De Reyes Recipe
Ingredients:
Instructions:
Nutrition Facts:
| Calories | 421 kcal |
|---|---|
| Protein | 7.8 g |
| Fat | 17.6 g |
| Carbs | 57 g |
| Fiber | 1.8 g |
| Sugar | 22 g |
| Sodium | 118 mg |
